
This article explains what packages and line items are, their use cases, and how to create them on the Amobee Platform.
To create packages/line items, you will need to have created an advertiser and an Insertion Order (IO) first. For an overview of the platform hierarchy, please read Platform Hierarchy.
Overview
Packages are where you can define the tactical details for your campaign (e.g., formats, environments, budgets, flights, bidding, goals, targeting, and more). With a 3-level hierarchy, a line item is automatically created when a package is created. Line items can be used to define more granular tactical details within a package.
As you create a package/line item, you can use the Forecaster on the right to help you refine the tactical details. The Forecaster can help determine if the package/line item will deliver against the set criteria, estimate potential reach, and identify optimal settings.
Getting Here
Within Campaigns, go to Packages/line items by clicking on the advertiser and the IO for which you want to create packages/line items. Click Add  and select Add New Package or Add New Line Item to create a new package or a new line item.
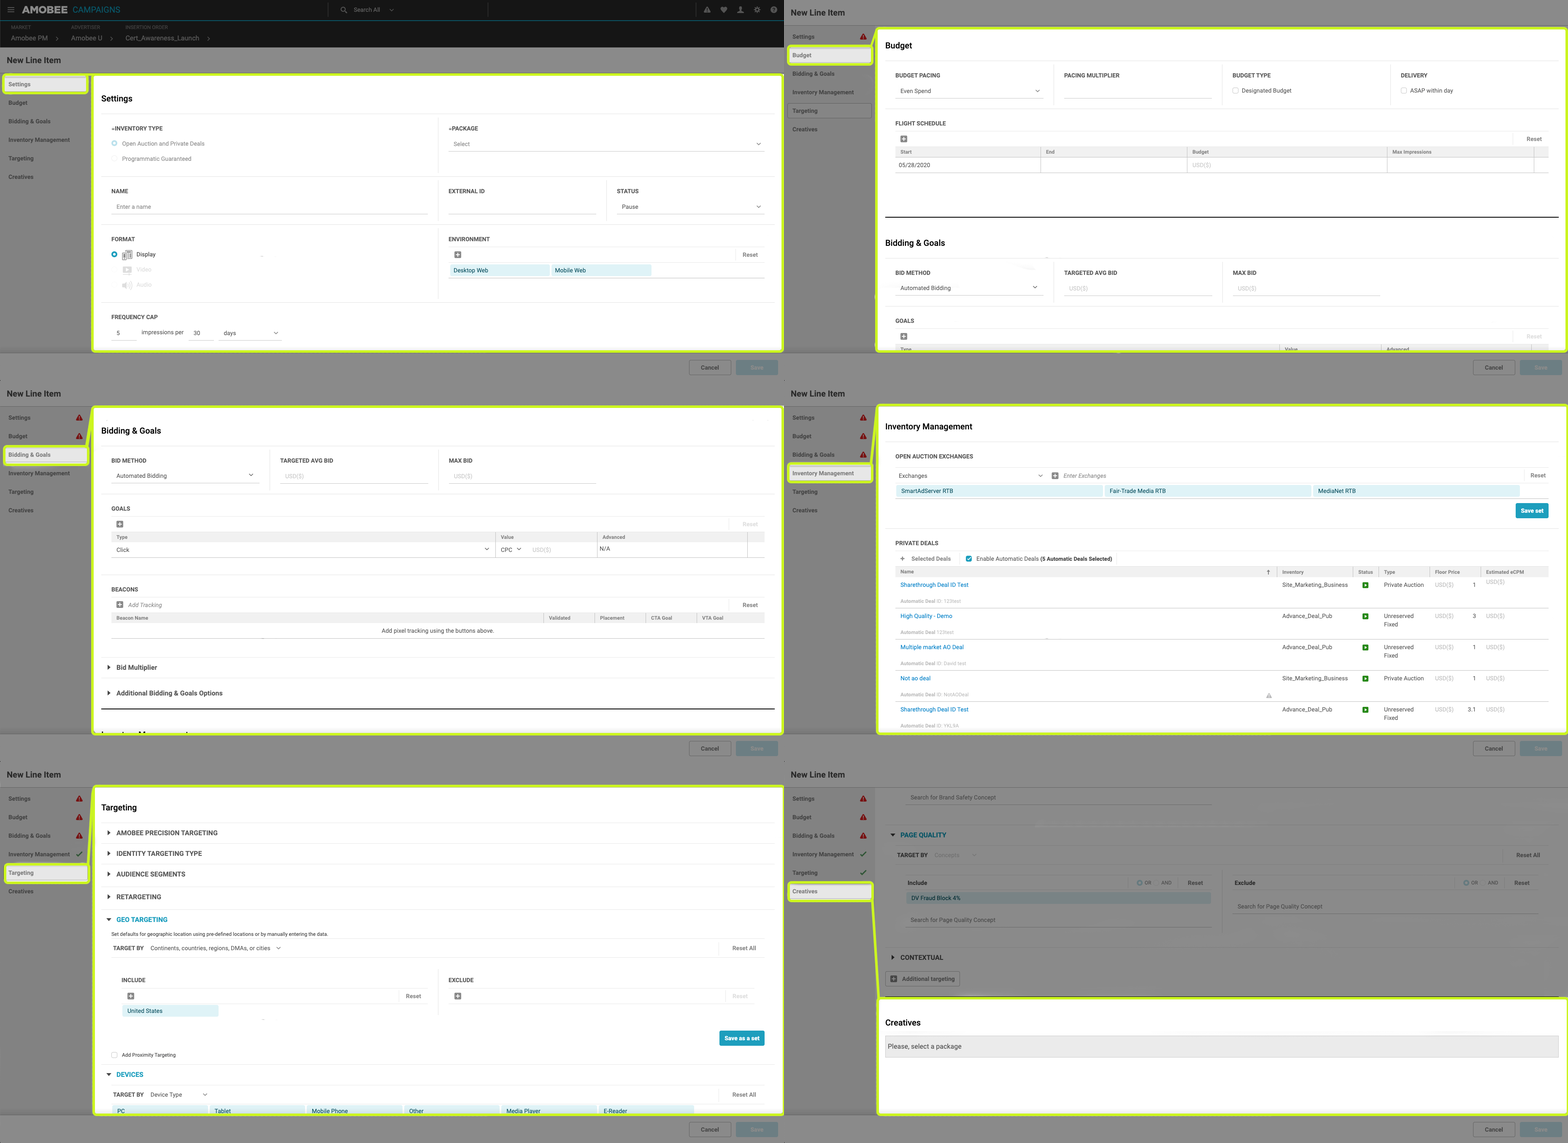
Package & Line Item Workflow Sections
The Package/Line Item workflow is broken out into six sections, listed on the left side. Scroll or click to navigate through each section. The Check  indicates all required fields have been properly filled out and the package/line item can be saved. The Warning
  indicates all required fields have not been properly filled out and the package/line item cannot be saved. Please review these sections, specifically the fields in red, before saving.
- Settings: Enter package/line item details to define the setup, e.g., inventory type, format, environment, etc.
- Budget: Enter the flight schedule and specify any budget and/or pacing parameters to prevent over- or under-delivery.
- Bidding & Goals: Enter the bidding details and goals with an option to add any additional third-party costs you would like to track and account for, e.g., ad serving, ad verification, data, etc.
- Inventory Management: Select the exchanges and/or private marketplace deals you would like to target with an option to enable and target automatic deals.
- Targeting: Add the targeting details for your package/line item, e.g., audience segments, geography, site/app lists, etc.
- Creatives: Assign uploaded creatives to the package/line item.
Enter package/line item details to define the setup, e.g., inventory type, format, environment, etc.
- Inventory Type: Select Open Auction and Private Deals or Programmatic Guaranteed. Bid shading works on open auctions only.
- Open Auction and Private Deals: Target open auction inventory, private auction deals, and/or unreserved fixed deals.
- Open Auction is not available if Audio is selected as the format. If Open Auction and Private Deals is selected, only private auction and unreserved fixed deals are available to target.
- Programmatic Guaranteed: Target guaranteed deals.
- Open Auction and Private Deals: Target open auction inventory, private auction deals, and/or unreserved fixed deals.
- Package: Select the package to which the line item belongs. This field only applies to line items.
- Name: Enter the name of the package/line item.
- External ID: Enter the corresponding third-party ID to map the package/line item for third-party reporting.
- Status: Select Play or Pause.
- Pause is selected by default. Select Play to set the package/line item live when you are ready.
- Format: Select Display, Video, or Audio.
- Once the package/line item has been saved, the format cannot be edited.
- Environment: Select Desktop Web, Mobile Web, Mobile App, Digital Out-of-Home (DOOH), and/or Connected TV App.
- The environments available for the package/line item will update based on the format selected. Digital Out-of-Home (DOOH) is only available if Display is selected as the format. Connected TV App is only available if Video is selected as the format.
- Frequency Cap: Enter the impression cap per minutes, hours, or days.
- If the line item uses the Household or Person Based Cross Device Identity graph for frequency capping, an additional cost will be incurred - be sure to check with your account team for pricing in your region.
- If you enter a Household Frequency Cap, you will also have to enter a Person Frequency Cap.
- Additional Settings Options: Click to view additional options.
- Mobile Options: Exclude mobile app inventory without device ID and/or non-optimized mobile web.
- Experiment: Select an experiment.
- Label: Choose a label to group the package/line item.
- Category: Select a category and sub-category for the advertiser.
- This field is used to match the information received from publishers when bidding and helps to prevent creative rejections.
Enter the flight schedule and specify any budget and/or pacing parameters to prevent over- or under-delivery.
- Budget Pacing: Select Auto-Allocate, ASAP, Daily, Even Spend, or Even Impressions.
- Auto-Allocate: Allocate budget automatically towards packages/line items based on their performance and ability to scale.
-
- ASAP: Allow the campaign to spend the total budget as soon as possible.
Tip: Amobee recommends enabling ASAP within Day instead as needed.
-
- Daily: Enter the daily cap in the Flight Schedule.
- Even Spend: Distribute spend evenly throughout the flight by entering the start/end date and budget in the Flight Schedule. If the line item is under-paced on one day, we will automatically redistribute the leftover to the remaining flight.
- Even Impressions: Distribute impressions evenly throughout the flight by entering the start/end date, max impressions, and budget in the Flight Schedule. Even Impressions is not available if Audio is selected as the format.
- A budget is required to prevent over-delivery.
- Pacing Multiplier: Enter a single pacing multiplier to over- or under-pace at the beginning of each flight, i.e., multiply the daily budget by the pacing multiplier. Pacing multiplier is only available if Even Spend is selected as the budget pacing. The multiplier can be entered as a number with up to two decimal points, ranging from 0.01 to 99.99.
- Budget Type: Check the box for Designated Budget to ensure no other packages/line items that are set to auto-allocate can steal budget from this package/line item, i.e., if you have a specific budget you need to fulfill and your campaign includes packages/line items that are also set to auto-allocate.
- Designated Budget is only available if Daily or Even Spend is selected as the budget pacing.
- The campaign will under-deliver if the package/line item is unable to fulfill its assigned budget.
- Delivery: Check the box for ASAP within Day to allow the campaign to spend the total daily budget as soon as possible.
- Flight Schedule: Enter the start date, end date, and budget for the package/line item.
- Click Add to manually add individual flights.
- Click Add
Enter the bidding details and goals with an option to add any additional third-party costs you would like to track and account for, e.g., ad serving, ad verification, data, etc. (See Automated Bidding Goals)
- Bid Method: Select Automated Bidding or Flat Bidding.
- Automated Bidding: Enter a targeted average bid and max bid to utilize Amobee’s algorithm, which dynamically adjusts your bid based on set goals.
- Automated Bidding is only available if Display or Video is selected as the format at the package/line item level.
- Flat Bidding: Enter flat bids for first- and second-price auction.
- Flat Bidding is the only bid type available for Audio.
- Automated Bidding: Enter a targeted average bid and max bid to utilize Amobee’s algorithm, which dynamically adjusts your bid based on set goals.
With Bid Shading, Amobee Platform’s algorithm predicts a win price, and if your entered bid price is higher than the win price, the Platform will automatically lower the bid price to win price to help you win bids while saving more.
- Goals (for Automated Bidding): Click Add to select up to two goals, i.e., Click, Action, and Viewability, and/or Completion for multi-goal optimization.
- Click: Enter the Cost-Per-Click (CPC) or Click-Through-Rate (CTR).
- Action: Select the pixel in Beacons and specify the Cost-Per-Action (CPA) value for Click-Through Actions (CTA) and/or View-Through-Actions (VTA).
- Check the box for Maximize Action Rate (AR) if the budget pacing is not set to auto-allocate.
- Click and Action cannot be selected as the two goals for the same package/line item.
- Viewability: Enter the viewability rate or vCPM and choose a viewability standard (i.e., MRC, GroupM, 100% In-View 3 Seconds, and 100% In-View 5 Seconds).
- Selecting Viewability as a goal may have an additional fee – be sure to check with your account team for pricing in your region.
- MOAT must be the selected display viewability vendor (at the advertiser level) in order to choose 100% In-View 3 or 5 Seconds.
- Completion: Enter the completion rate or CPCV.
- Goals (for Flat Bidding): Select No Optimization, Maximize CTR, or Maximize Action Rate (AR).
- No Optimization: No goal is needed
- Maximize CTR: Achieve the highest CTR while spending in full.
- Maximize Action Rate (AR): Select the pixel in Beacons to achieve the highest action rate while spending in full.
- Viewability Measurement (for Video): Disable Amobee’s viewability measurement to ensure full delivery as some publishers do not allow fourth-party wrapped creatives.
- Beacons: Add beacon(s) for additional tracking.
- Beacon tracking is required if Action or Maximize Action Rate (AR) is selected as the goal.
- Bid Multiplier: Click to add and apply bid multipliers for Ads, Apps, Audiences, Daypart, Devices, Geography, Inventory Sources, and/or Sites.
- Update bid multipliers in-line for the targeting options displayed in the drop-down, i.e., Daypart, Devices, and/or Inventory Sources.
- Export the bid multiplier Excel template for updates across all available targeting options.
- Bid multipliers can be entered as numbers with up to two decimal points, ranging from 0.00 to 99.99.
- If Automated Bidding is selected as the bid type, bid multipliers can only be applied for Audiences, Daypart, and Geography. Only Daypart is available for in-line updates.
- Additional Bidding Goals Options: Click to view additional options.
- Third-Party Costs: Add costs tracked and incurred for the campaign that may be running outside the Amobee Platform, e.g., ad serving, ad verification, data, etc.
- Enter the cost type, vendor, CPM cost, and who the cost will be paid by.
- Third-Party Costs: Add costs tracked and incurred for the campaign that may be running outside the Amobee Platform, e.g., ad serving, ad verification, data, etc.
Inventory Type: Shows the inventory type selected in the settings.
Select open auction exchanges and/or private deals you would like to target with an option to enable and target automatic deals.
- You can view Open Auction Exchanges and Private Deals within the flyout panel.
- Easily search and filter private deals.
Open Auction Exchanges: All exchanges are selected by default with an option to unselect.
- Private Deals: Search for and add existing private auction and/or unreserved fixed deals with an option to filter by label, KPI, inventory source, and/or type.
- Bid CPM: Enter the CPM.
- Click Bulk Edit
 to increase, decrease, or overwrite the CPM for multiple deals.
- Click Bulk Edit
- Bid CPM: Enter the CPM.
- Enable Publisher Bid CPM: Check the box to ensure you bid above the floor price on every bid response.
- Enable Automatic Deals: Check the box to target automatic deals.
- Click to view all automatic deals with an option to remove any deals you do not want to target.
- Please note the following:
- Open auction exchanges do not affect the deals selected. Unselect all open auction exchanges if you want to only target the deals selected.
- Enable Publisher Bid CPM and bulk editing the CPM are only available if CPM is selected as the bid type.
- Automatic and non-automatic deals must be bulk edited separately.
- Programmatic Guaranteed
- Private Deals: Search for and add existing guaranteed deals with an option to filter by label, KPI, and/or inventory source.
- Please note the following:
- Only one guaranteed deal can be added to a package.
- If a guaranteed deal is added, you will not be able to select an environment.
- The bid CPM is automatically calculated and cannot be changed. It includes the pre-negotiated fixed price, Amobee’s fees, and any third-party costs.
- The budget is also automatically calculated and cannot be changed. It is based on the bid CPM.
- Please note the following:
- Private Deals: Search for and add existing guaranteed deals with an option to filter by label, KPI, and/or inventory source.
Add the targeting details for your package/line item, e.g., audience segments, geography, site/app lists, etc.
Assign uploaded creatives to the package/line item.
Creative Rotation: Select how you want to rotate the creatives.
- Weighted: Creatives are assigned a percentage.
- Optimized: Creatives are optimized based on a click or action rate.
- Best Performing: The creative with the highest click or action rate is served 75% of the time. The remaining creatives are served evenly 25% of the time.
- Please note the following:
- If Weighted is selected, the percentages assigned to the creatives must total 100%.
- For Optimized and Best Performing, select click or action for the creative rotation at the IO level.
- Assigned Creatives: Select the creative(s) you want to assign to the package/line item.
Comments
Please sign in to leave a comment.